Tuesday, 14 April 2015

Luminous Mittens4


This time the Project will be finished - thanks to CAIS for actively pushing and helping!!!

It's a shame that I have been very very slow with this Project.... meanwhile I have changed my car a couple of times, started a new company, had some health problems, arranged kids' birthdays, ice-swimming many times, learn how to drive  wheel loader and how to shave mens' bear using straight razor - or just being lazy :). Well.. all kind of good reasons
.. But still...
After finishing the handicraft work the Project got more interesting but much more challenging for me. I really had some problems with fitting the Lilypad inside the mittens - and so that I can remove it to the other mitten (depending if I she is walking or riding the bicycle when using the mittens).


First of all we needed to programme the Lilypad (we worked together with CAIS, and I think I finally could do it also By myself - THANKS :)  !  ) 
are the lights blinking?
Looks so nice! Minus - Plus and programmed channels


The programme itself is simple
Programme is working


Now we need to test the battery
Led-lights to the mittens


To make Lilypad and battery
removable makes this a bit complicated.
I have used snaps to removeble connections
 

There is also on-off button included,
and it seems like working. However, this conductive yarn or the snaps I have used are not connecting all the time?


Pocket was needed to hold
 the Lilypad and battery

Lisää kuvateksti

Finally DONE!!! And working ... JIHUU!!!

SEE THE great VIDEO BELOW

CAIS you finally can have your Luminous mittens (although it is not winter anymore...)

F4E by Liisa


Monday, 9 February 2015

Lighting words (part 3 - code)

The code for this project is INCREDIBLE simple, we only have to turn ON/OFF LEDs


I mainly follow the example that it is given in the arudino software and add some lines, so here is the code:

/*
  Blink
  Turns on an LED on for one second, then off for one second, repeatedly.

  Most Arduinos have an on-board LED you can control.  If you're unsure what
  pin the on-board LED is connected to on your Arduino model, check
  the documentation at http://arduino.cc

  This example code is in the public domain.
  modified 8 May 2014
  by Scott Fitzgerald
  modified  January 2015
  by CAIS
 */


// the setup function runs once when you press reset or power the board
void setup() {
  // initialize digital pins 7,8,9,10 as an output.
  pinMode(7, OUTPUT);
  pinMode(8, OUTPUT);
  pinMode(9, OUTPUT);
  pinMode(10, OUTPUT);
}


// the loop function runs over and over again forever
  void loop() {
  digitalWrite(10, HIGH);   // turn the LED on (HIGH is the voltage level)
  delay(500);                        // wait for half a second
  digitalWrite(9, HIGH);  
  delay(500);
  digitalWrite(8, HIGH);   
  delay(500);
  digitalWrite(7, HIGH);   
  delay(500);          

  digitalWrite(10, LOW);    // turn the LED off by making the voltage LOW
  delay(500);                       // wait for half a second
  digitalWrite(9, LOW);    
  delay(500);
  digitalWrite(8, LOW);    
  delay(500);            
  digitalWrite(7, LOW);    
  delay(500);             
}

That is it!!!
Compile and send to your lilipad.

In this example, we are utilizing pins 7,8,9 and 10, therefore those are the pins we stitched on the  lilipad ;)


Next step, for me, is to decorate my final product, but should be done on the next weekend!

====
F4E by CAIS

Lighting words (part 2)

Finally!
A project of lighting words is almost done!
[ it needs the final decoration details :)]

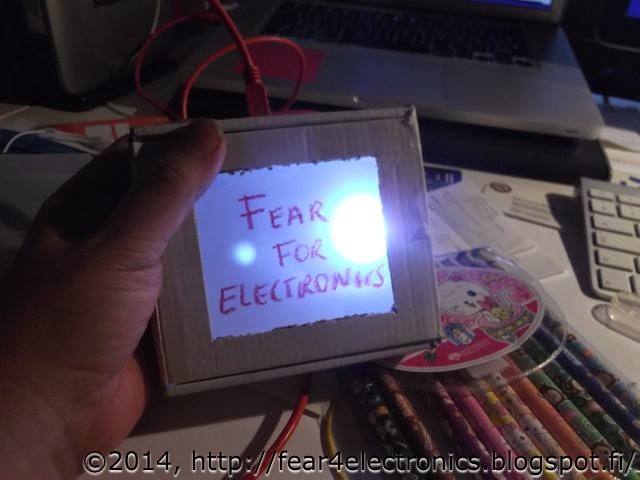
Let me show you, how it looks:


 The photo above show my illuminating words. The way I did it - you do not remember please read the post lighting words part 1 - was by locating four LEDs inside the box (photo below)

With conductive ink all the the negative lead (-), or cathode, are connected.

The positive lead (+) or anode, is stitched with conductive thread separately, as each one connects with a pint of my lilipad.

NOTE: one of the reasons it took me long to advance, is because once I let the LED fixed in the box, they were not working. It was strange. Until I test one by one, and I noticed the conductive ink had broken segments, so careful about this. 


Next, I had been thinking how to avoid keep my lilipad dedicated to this project, and allow me to move it freely between project. I confess I do not have the budget for buying several lilypads.

The solution, to use snap buttons. Unfortunately at the moment I did not have high quality ones, so I use the ones I had, behind the box and add some conductive ink to assure that the energy will go through my button.

On a white cloth I sew, with conductive thread, the lilipad, and as it was tested. 

 Then I cut the extension of each one of the pins, so I can clip them to the box.


and IT WORKS!!!!


Need to finish to decorate the box, and polish my lilipad sewing as I did it as in testing mode, but I am so glad it woks!!!!

In a next post I will publish the code utilized for this.

====
F4E by CAIS

Saturday, 7 February 2015

Luminous mittens 3

Done! .. the easy part "hardware" , I mean...

 
The next step will be more exiting -  "the software" how to get the lights on! Now I am going to figure out the mysterious world of Lilipads, leds and programming ... I'll let you know

Luminous mittens 2

Finally the mitten itself is almost done! Travelling by train is perfect for handicraft....


..still the thumb is missing...

Friday, 30 January 2015

Luminous Mittens

This project is to prepare Luminous Mittens - helps you to be seen during the dark winter nights of Finland!


Sunday, 5 October 2014

Lighting words (part 1)

In the following weeks, I will be busy traveling due to work.
Now, I do not have time neither, but I want to do this, otherwise we will not move forward. So against the clock let's start the project: Lighting words utilizing my Lilipad. (note: I confess, I am also thinking how to re-use my Lilipad as I only have one).

The first plan towards the lighting words is to create the "hardware" where the advertisement will be. In this case, I use an empty box where my business cards were delivered, that is, it is a relatively small box. 


So from that box, I cut a rectangle from the cover (see next photo). In this hole I will  put the paper with the word I want to light.


Next I test 4 LEDs (next photo), which were programmed according on how I want them to turn my lighting words on and off. 


Once I was happy with the sequence of my LEDs, then I transfer them to the box. Each LED was firmly glued to its corresponding location inside the box as it is shown in the picture:


Afterwards with conductive ink, I made the connections between the LEDs


Behind the box (next photo) I connect the corresponding elements to the Lilipad via a conductive thread.


You can see in the next photo how the thread is sew to the ends of the LEDs as it corresponds (+) and (-)


Next, with vellum paper (i.e. translucent paper) to write the words to illuminate: 


After writing the words I located the paper behind the whole of the box. 


to be able to close the leap of the box and let the LEDs to illuminate the sign.


Then I turn the Lilipad on and voilà! the words get inluminated. 


Need to work with balancing  the impedance of the LEDs, but that will be done in my return.
Great I was able to do this in short period of time!

====
F4E by CAIS